windows 7 dpi einstellungen

Scott Hanselman has a great blog post about how life on a high-DPI computer can be painful. A couple of weeks ago, I upgraded to a high-DPI laptop (the Samsung Ativ Book 9 Plus). It has a 3200 x 1800 native resolution, which has 278% of the pixel-area of my previous full-HD screen, but in only 13 inches compared to the 15 inches of my older model. Needless to say, on my new laptop, it’s very important to turn on DPI-scaling to make things readable on this monitor. For those not familiar with DPI-scaling, it proportionally adjusts the size of elements on the screen without giving up any of the screen’s resolution. In other words, it makes things bigger without making them fuzzier. I’m happy to say that Windows 8.1 has some great improvements in this area. In this blog post, my intention is not to show you how to use DPI-scaling in Windows, but to let you know about a solution I found to one of the more annoying issues I’ve discovered so far with using DPI-scaling: Remote Desktop is not DPI scaling-aware.
After I scaled my screen down to full-HD (a simulated 1920 x 1080 starting at 3200 x 1800 at 167% scaling), I opened a remote desktop session to a server I help maintain and immediately noted that it was displayed at my monitor’s full native resolution. It was ignoring my scaling settings, which made everything almost impossible to read. Fortunately, I discovered a utility from Microsoft called Remote Desktop Connection Manager which is meant to provide sysadmins with an easier way to manage multiple servers in one place, such as server farms or a computer lab environment. Fortunately for us, it also is aware of Window’s DPI-scaling APIs, so it respects your scaling settings. To set it up, follow these steps: Notice that you are now connected to your remote machine and that the remote machine’s screen resolution is respecting your scaling settings. Access IIS Express from a Remote Device What Branch Am I On? Remove the node_modules Folder in Windows
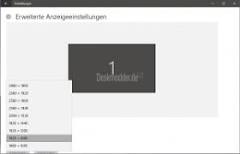
ListView with Switches in NativeScript Android Network Connectivity Monitor for NativeScript WinForms Scaling at Large DPI Settings–Is It Even Possible?The QuickBooks Desktop display is affected by your Microsoft Windows resolution and font settings. If these settings are not optimized, you may see:To correct your QuickBooks display, you may need to adjust your font, screen resolution, or other Windows settings (such as DPI). Solution 1: Change Windows DPI settings QuickBooks is designed to work with the default settings of Windows DPI. If you use anything other than the default values, you may see distortion, buttons missing, fields missing, etc. Windows 10 Important: Although Windows 10 is currently not supported, we recommend the following steps that may resolve the issue. From your keyboard, press the Windows + X keys and click Control Panel. Click Appearance and Personalization and then click Display. From Change size of items section, click Set a custom scaling level.

Click the link Make text and other items larger or smaller from the bottom of the display settings. Make sure the checkbox for Let me choose one scaling level for all my displays is not checked. If it is checked, uncheck it. Drag the slider to Smaller - 100% (all the way to the left). This keeps text and other items at normal size. Save your work, then you will need to reboot your computer for this change to take effect. Hover your mouse over the Desktop (Wallpaper), right click, then click Screen Resolution. Click the circle next to Smaller - 100%. Hover your mouse over the Desktop (Wallpaper), right click, then click Personalize. On the left side, click Adjust font size (DPI). Select Default scale (96 DPI). Solution 2: Change the properties of QuickBooks Right click on the icon for QuickBooks. Left click on Properties. Left click on the Compatibility tab. Check the box next to Disable display scaling on high DPI settings.

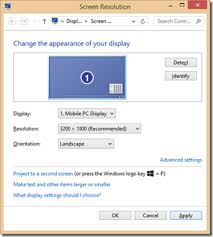
Open QuickBooks and check to see if the windows are visible. Solution 3: Edit the screen resolution settings on your computer Important: Although Windows 10 is currently not supported, we recommend the following steps that may resolve the issue. Right-click on your Desktop and click Display settings. In the left pane, click Display. At the bottom of the right side of the same page, click Advanced display settings.Note: If you have more than one display connected to your PC, select the display you want to change. In the Resolution section, select a screen resolution that is at least 1024 x 768 or higher. Note: You will have 15 seconds to either Keep changes or Revert before the window automatically go back to its previous resolution. Go to Desktop (Wallpaper) and right-click an empty space. Locate the Resolution drop-down menu and select a resolution that is at least 1024 x 768 or higher: Note: QuickBooks is not designed to work on resolution settings lower than 1024 X 768.