windows 7 disk shrink not enough space

Disclaimer: This is what worked for me, and it’s not guidance from Microsoft. It may not work for you. Since this involves resizing partitions, it could wipe out all of your data. You may want to create a backup first. Proceed at your own risk. Over the weekend I upgraded my machines at home to Windows 10. I had two desktops and one Surface Pro (the first one) running Windows 8.1. Since I had multiple machines to upgrade, I downloaded the Windows 10 installer to a USB flash drive using the media creation tool mentioned on Download Windows 10. For me, the media creation tool wouldn’t recognize the USB drive, so I chose the ISO and copied the contents to my flash drive. I used the flash drive to upgrade my Surface Pro with no issues. Then I tried to upgrade my desktops. The first one failed with the message saying, “We couldn’t update the system reserved partition.” That happened after it downloaded updates (that takes a while). I tried my other desktop and got the same message.

I followed the instructions and had more than 50 MB free on system partition. I ran the Windows 10 upgrade, and this time it got further before failing and failed with a different message (I don’t remember exactly what it said).
windows 7 remote desktop zugriff verweigert At this point I decided to extend the system partition.
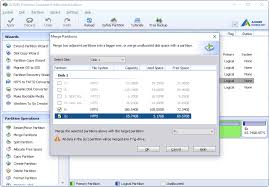
windows 7 loader terbaikThe thread on reddit mentioned a tool called MiniTool Partition Wizard Free. I did a search and found a review on PCMag. They were complimentary of the pro version, so I decided to give it a try. The UI makes it really easy to drag the OS partition to resize it a bit smaller and then extend the system reserved partition to make it bigger. I shrunk my OS partition by 200 MB and increased the system reserved partition to 300 MB. After hitting Apply, Windows has to be rebooted for the tool to make the change.
I did that and let it do its work, and then all was good. Windows 8.1 booted up just fine with the newly resized partitions. I ran the Windows 10 upgrade again, and the upgrade proceeded smoothly. Thanks to the folks at MiniTool for a great tool! I have a physical disk with two partitions, an old OS partition (with MBR) of 296GB and a RECOVERY partition of 2048MB (a default DELL recovery partition), both are not in use. I have successfully resized the OS partition from 296GB to 174GB with the following command: which shrinks to the maximum shrinkable space. However, the partition only uses 56GB and I want to create a partition of at least under 128GB (to be able to create a VHD of it). When I shrink again, I receive the following error: According to this post I should defrag, which I did using several tools (open source UltraDefrag seemed to do the best job). It seems that all files are on top of the disk, but how can I check that for sure? And if not, how can I manually defrag/move files, to claim the largest possible consecutive free disk space?

Or: what should I do to shrink the volume to its current used size plus a bit? (Note: I tried to create a new VHD with the CREATE VDISK command pointing to the oversized VHD for the source-parameter, but here too, the 128GB/137GiB limit prevents success, it seems. Mounting the VHD and shrinking it had exactly the same effect as doing it on the original physical disk, which is why I now try to first limit the physical partition size.) windows partition defrag diskpart It doesn't really matter whether its an OS disk or a data disk. In both cases, the middle of the disk is occupied by $MFTMirr which copies vital bits of the MFT Table. This file is unmovable, even though Microsoft made it available for moving since Windows XP. So far I have found only one tool that can reliably move these files: PerfectDisk. It has a free, fully-functional, thirty-days version. It can only move these Metadata and MFT files when in offline mode: Select Boot Time on its main tab and either reboot or, if possible, defrag in offline mode.
After this, the command SHRINK worked as expected. If you need more background info or want to know how to do this in more detail, I decided to mock up a little blog about the issue. I am a dummy. and it took me 2 days to finally shrink my C: sys volume (WINDOWS 7). the solution I found is terribly simple. I downloaded the free app PerfectDisc, installed on 'Global Settings' I selected and ticked: PerfectDisk manages book and prefetch files' right click on C: - Drive preferences - select: 'Default optimization method' = 'Prep for Shrink' and 'Free Space search method' = 'Forward' now start defragging (play button) try also to turn on 'boot time defrag', and press the 'boot time defrag' button in the upper menu (requires restart) Good Luck everybody !!! In my case I resolved "The specified shrink size is too big" on data disk by deleting files which had some tricky permissions (I copied those from MacOS some time ago).Browse other questions tagged windows partition defrag diskpart or ask your own question.